How To Create A Simple Calculator App Using Android Studio
If you are new to android development , then Calculator app is a better application to start with. In this post , we will learn how to create a simple calculator android app using android studio.

Calculator App Using Android Studio
To create a simple calculator app , open android studio , create a new project and choose Empty Activity. Enter name of the application as "Calculator" & select "Java" as language.
Now goto activity_main.xml & delete "Hello World" TextView. After that goto code section of design and change the code from
Now goto activity_main.xml & delete "Hello World" TextView. After that goto code section of design and change the code from
<?xml version="1.0" encoding="utf-8"?>
<androidx.constraintlayout.widget.ConstraintLayout xmlns:android="http://schemas.android.com/apk/res/android"
    xmlns:app="http://schemas.android.com/apk/res-auto"
    xmlns:tools="http://schemas.android.com/tools"
    android:layout_width="match_parent"
    android:layout_height="match_parent"
    tools:context=".MainActivity"/>
<?xml version="1.0" encoding="utf-8"?>
<LinearLayout xmlns:android="http://schemas.android.com/apk/res/android"
    xmlns:app="http://schemas.android.com/apk/res-auto"
    xmlns:tools="http://schemas.android.com/tools"
    android:layout_width="match_parent"
    android:layout_height="match_parent"
    android:orientation="vertical"
    tools:context=".MainActivity"/>
Now we need to add elements in our design so that user can use them to do calculations. For that we will use two texts [ Number (Decimal) - so that we can calculate decimal numbers also ] , four buttons ( Add , Subtract , Multiply & Divide ) & one TextView to show the result.
Lets name the elements as follows :
- Number (Decimal) - txt1 & txt2
- Button - btnadd , btnsubs , btnmult , btndiv
- TextView - result
Also , add an image of calculator on the top , so that the simple calculator app will looks better.
To add image in andoid studio , click on File -> New -> Image Asset . In icon type , choose it as Action bar & Tab icon. In name , enter any name like imgcalculator. Then in path choose the image which you want to add & click on Next & Finish.
Now add one ImageView to the design & one dialog will be opened . Choose the image which you recently added (imgcalculator). After that resize it using stretching it.
Now click on the image & goto attribute tab and search for layout_margin. Enter "25dp" in layout_marginTop.
Desigining Simple Calculator App In Andoid Studio
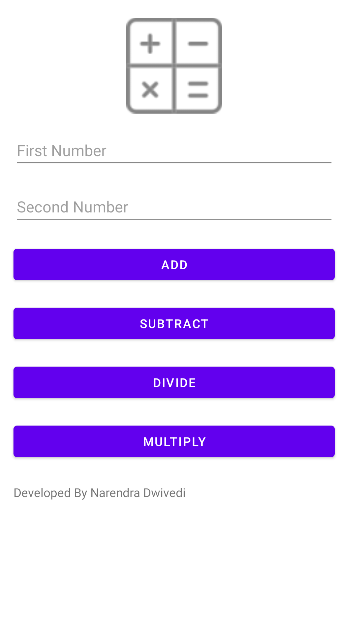
This is the design which we have created. In this design , we have added "hint" attribute in both the Number Text to show placeholder. Also we have added some layout_margin to make our design looks better.
Design Code Of Simple Calculator App (activity_main.xml)
<?xml version="1.0" encoding="utf-8"?>
<LinearLayout xmlns:android="http://schemas.android.com/apk/res/android"
    xmlns:app="http://schemas.android.com/apk/res-auto"
    xmlns:tools="http://schemas.android.com/tools"
    android:layout_width="match_parent"
    android:layout_height="match_parent"
    android:orientation="vertical"
    tools:context=".MainActivity">

    <ImageView
        android:id="@+id/imageView"
        android:layout_width="match_parent"
        android:layout_height="111dp"
        android:layout_marginTop="25dp"
        app:srcCompat="@drawable/imgcalculator" />

    <EditText
        android:id="@+id/txt1"
        android:layout_width="match_parent"
        android:layout_height="wrap_content"
        android:layout_marginLeft="20dp"
        android:layout_marginTop="20dp"
        android:layout_marginRight="20dp"
        android:ems="10"
        android:hint="First Number"
        android:inputType="numberDecimal"
        tools:ignore="TouchTargetSizeCheck,SpeakableTextPresentCheck" />

    <EditText
        android:id="@+id/txt2"
        android:layout_width="match_parent"
        android:layout_height="wrap_content"
        android:layout_marginLeft="20dp"
        android:layout_marginTop="20dp"
        android:layout_marginRight="20dp"
        android:ems="10"
        android:hint="Second Number"
        android:inputType="numberDecimal"
        tools:ignore="SpeakableTextPresentCheck,TouchTargetSizeCheck" />

    <Button
        android:id="@+id/btnadd"
        android:layout_width="match_parent"
        android:layout_height="wrap_content"
        android:layout_marginLeft="20dp"
        android:layout_marginTop="20dp"
        android:layout_marginRight="20dp"
        android:text="Add" />

    <Button
        android:id="@+id/btnsubs"
        android:layout_width="match_parent"
        android:layout_height="wrap_content"
        android:layout_marginLeft="20dp"
        android:layout_marginTop="20dp"
        android:layout_marginRight="20dp"
        android:text="Subtract" />

    <Button
        android:id="@+id/btndiv"
        android:layout_width="match_parent"
        android:layout_height="wrap_content"
        android:layout_marginLeft="20dp"
        android:layout_marginTop="20dp"
        android:layout_marginRight="20dp"
        android:text="Divide" />

    <Button
        android:id="@+id/btnmult"
        android:layout_width="match_parent"
        android:layout_height="wrap_content"
        android:layout_marginLeft="20dp"
        android:layout_marginTop="20dp"
        android:layout_marginRight="20dp"
        android:text="Multiply" />

    <TextView
        android:id="@+id/result"
        android:layout_width="match_parent"
        android:layout_height="wrap_content"
        android:layout_marginLeft="20dp"
        android:layout_marginTop="25dp"
        android:layout_marginRight="20dp"
        android:text="Developed By Narendra Dwivedi" />
</LinearLayout>
Simple Calculator App Using Android Studio
Now our design is ready , we need to code to develop calculator android app.
Firstly we need to declare Buttons , TextView & EditText
package com.nd.calculator;

import androidx.appcompat.app.AppCompatActivity;

import android.os.Bundle;
import android.widget.Button;
import android.widget.EditText;
import android.widget.TextView;

public class MainActivity extends AppCompatActivity {
    Button btnadd,btnsubs,btnmult,btndiv;
    EditText txt1,txt2;
    TextView result;
    @Override
    protected void onCreate(Bundle savedInstanceState) {
        super.onCreate(savedInstanceState);
        setContentView(R.layout.activity_main);
    }
}
	      btnadd=findViewById(R.id.btnadd);
        btnsubs=findViewById(R.id.btnsubs);
        btndiv=findViewById(R.id.btndiv);
        btnmult=findViewById(R.id.btnmult);

        txt1=findViewById(R.id.txt1);
        txt2=findViewById(R.id.txt2);

        result=findViewById(R.id.result);
Now weneed to create code for btn clicks ( all buttons ). Lets code for btnadd.
Understanding The Logic Of Button Code
In button , firstly we have to make sure that the input values of both the EditText are not empty. For this we will use if else condition. If both the EditText values are not empty , then we will store the value of these EditText in variables & parse them as float. Then we will use third variable ( like c=a+b ) to determine the output and will show it in the result TextView.
Addition Code Of Calculator App
btnadd.setOnClickListener(new View.OnClickListener() {
            @Override
            public void onClick(View view) {
                // Checking Input First Is Blank Or Not
                if (txt1.getText().toString().equals("")) {
                    // Showing Toast (Message)
                    Toast.makeText(MainActivity.this, "Please Enter Number", Toast.LENGTH_SHORT).show();
                } else if (txt2.getText().toString().equals("")) {
                    Toast.makeText(MainActivity.this, "Please Enter Number", Toast.LENGTH_SHORT).show();
                }

                // Both Inputs Are Not Blank , Starting Calculation
                else {
                    float a, b, c;
                    a = Float.parseFloat(txt1.getText().toString());
                    b = Float.parseFloat(txt2.getText().toString());
                    c = a - b; // Using Third Variable To Store Output Value
                    result.setText("The Subtraction Result Is " + c);

                }
            }
        });
Subtraction Code Of Calculator App
btnsubs.setOnClickListener(new View.OnClickListener() {
            @Override
            public void onClick(View view) {
                // Checking Input First Is Blank Or Not
                if (txt1.getText().toString().equals("")) {
                    // Showing Toast (Message)
                    Toast.makeText(MainActivity.this, "Please Enter Number", Toast.LENGTH_SHORT).show();
                } else if (txt2.getText().toString().equals("")) {
                    Toast.makeText(MainActivity.this, "Please Enter Number", Toast.LENGTH_SHORT).show();
                }

                // Both Inputs Are Not Blank , Starting Calculation
                else {
                    float a, b, c;
                    a = Float.parseFloat(txt1.getText().toString());
                    b = Float.parseFloat(txt2.getText().toString());
                    c = a- b; // Using Third Variable To Store Output Value
                    result.setText("The Subtraction Result Is " + c);

                }
            }
        });
Multiplication Code Of Calculator App
btnmult.setOnClickListener(new View.OnClickListener() {
            @Override
            public void onClick(View view) {
                // Checking Input First Is Blank Or Not
                if (txt1.getText().toString().equals("")) {
                    // Showing Toast (Message)
                    Toast.makeText(MainActivity.this, "Please Enter Number", Toast.LENGTH_SHORT).show();
                } else if (txt2.getText().toString().equals("")) {
                    Toast.makeText(MainActivity.this, "Please Enter Number", Toast.LENGTH_SHORT).show();
                }

                // Both Inputs Are Not Blank , Starting Calculation
                else {
                    float a, b, c;
                    a = Float.parseFloat(txt1.getText().toString());
                    b = Float.parseFloat(txt2.getText().toString());
                    c = a*b; // Using Third Variable To Store Output Value
                    result.setText("The Multiplication Result Is " + c);

                }
            }
        });
Division Code Of Calculator App
  btndiv.setOnClickListener(new View.OnClickListener() {
            @Override
            public void onClick(View view) {
                // Checking Input First Is Blank Or Not
                if (txt1.getText().toString().equals("")) {
                    // Showing Toast (Message)
                    Toast.makeText(MainActivity.this, "Please Enter Number", Toast.LENGTH_SHORT).show();
                } else if (txt2.getText().toString().equals("")) {
                    Toast.makeText(MainActivity.this, "Please Enter Number", Toast.LENGTH_SHORT).show();
                }

                // Both Inputs Are Not Blank , Starting Calculation
                else {
                    float a, b, c;
                    a = Float.parseFloat(txt1.getText().toString());
                    b = Float.parseFloat(txt2.getText().toString());
                    c = a/b; // Using Third Variable To Store Output Value
                    result.setText("The Division Result Is " + c);

                }
            }
        });
Complete Code Of Simple Calculator App Using Android Studio
package com.nd.calculator;

import androidx.appcompat.app.AppCompatActivity;

import android.os.Bundle;
import android.view.View;
import android.widget.Button;
import android.widget.EditText;
import android.widget.TextView;
import android.widget.Toast;

public class MainActivity extends AppCompatActivity {
    Button btnadd,btnsubs,btnmult,btndiv;
    EditText txt1,txt2;
    TextView result;
    @Override
    protected void onCreate(Bundle savedInstanceState) {
        super.onCreate(savedInstanceState);
        setContentView(R.layout.activity_main);

        btnadd=findViewById(R.id.btnadd);
        btnsubs=findViewById(R.id.btnsubs);
        btndiv=findViewById(R.id.btndiv);
        btnmult=findViewById(R.id.btnmult);

        txt1=findViewById(R.id.txt1);
        txt2=findViewById(R.id.txt2);

        result=findViewById(R.id.result);

        btnadd.setOnClickListener(new View.OnClickListener() {
            @Override
            public void onClick(View view) {
                // Checking Input First Is Blank Or Not
                if (txt1.getText().toString().equals("")) {
                    // Showing Toast (Message)
                    Toast.makeText(MainActivity.this, "Please Enter Number", Toast.LENGTH_SHORT).show();
                } else if (txt2.getText().toString().equals("")) {
                    Toast.makeText(MainActivity.this, "Please Enter Number", Toast.LENGTH_SHORT).show();
                }

                // Both Inputs Are Not Blank , Starting Calculation
                else {
                    float a, b, c;
                    a = Float.parseFloat(txt1.getText().toString());
                    b = Float.parseFloat(txt2.getText().toString());
                    c = a + b; // Using Third Variable To Store Output Value
                    result.setText("The Addition Result Is " + c);

                }

            }
        });

        btnsubs.setOnClickListener(new View.OnClickListener() {
            @Override
            public void onClick(View view) {
                // Checking Input First Is Blank Or Not
                if (txt1.getText().toString().equals("")) {
                    // Showing Toast (Message)
                    Toast.makeText(MainActivity.this, "Please Enter Number", Toast.LENGTH_SHORT).show();
                } else if (txt2.getText().toString().equals("")) {
                    Toast.makeText(MainActivity.this, "Please Enter Number", Toast.LENGTH_SHORT).show();
                }

                // Both Inputs Are Not Blank , Starting Calculation
                else {
                    float a, b, c;
                    a = Float.parseFloat(txt1.getText().toString());
                    b = Float.parseFloat(txt2.getText().toString());
                    c = a - b; // Using Third Variable To Store Output Value
                    result.setText("The Subtraction Result Is " + c);

                }
            }
        });
        btnmult.setOnClickListener(new View.OnClickListener() {
            @Override
            public void onClick(View view) {
                // Checking Input First Is Blank Or Not
                if (txt1.getText().toString().equals("")) {
                    // Showing Toast (Message)
                    Toast.makeText(MainActivity.this, "Please Enter Number", Toast.LENGTH_SHORT).show();
                } else if (txt2.getText().toString().equals("")) {
                    Toast.makeText(MainActivity.this, "Please Enter Number", Toast.LENGTH_SHORT).show();
                }

                // Both Inputs Are Not Blank , Starting Calculation
                else {
                    float a, b, c;
                    a = Float.parseFloat(txt1.getText().toString());
                    b = Float.parseFloat(txt2.getText().toString());
                    c = a*b; // Using Third Variable To Store Output Value
                    result.setText("The Multiplication Result Is " + c);

                }
            }
        });
        btndiv.setOnClickListener(new View.OnClickListener() {
            @Override
            public void onClick(View view) {
                // Checking Input First Is Blank Or Not
                if (txt1.getText().toString().equals("")) {
                    // Showing Toast (Message)
                    Toast.makeText(MainActivity.this, "Please Enter Number", Toast.LENGTH_SHORT).show();
                } else if (txt2.getText().toString().equals("")) {
                    Toast.makeText(MainActivity.this, "Please Enter Number", Toast.LENGTH_SHORT).show();
                }

                // Both Inputs Are Not Blank , Starting Calculation
                else {
                    float a, b, c;
                    a = Float.parseFloat(txt1.getText().toString());
                    b = Float.parseFloat(txt2.getText().toString());
                    c = a/b; // Using Third Variable To Store Output Value
                    result.setText("The Division Result Is " + c);

                }
            }
        });
    }
}
Building .apk File For Simple Calculator App
After designing & coding , the last process is to generate installable application which can be installed on your android device. For that we need to follow the steps given below.
- Click On Build -> Generate Signed Bundle / APK
- There Will Be Two Options : Android App Bundle & APK. Choose APK Option
- Now We Need To Enter Key Details. If You Don't Have Key , Create A New One By Entering Simple Details
- After That Choose Release As Build Varient & Click On Finish
- You Will Get .apk File In Destination Folder Which You Have Selected During Choosing Build Varient
Output Of Simple Calculator App Using Android Studio

Download Simple Calculator App In Android Studio Source Code Project
I am providing the project of Simple Calculator App Using Andorid Studio in Java so that you can use it for learning or in your project.
Conclusion
In this way , we have successfully developed Simple Calculator Application In Java Using Android Studio. If you have any doubt , ask them in comment.
Post a Comment